How to be successful grip waxing with Toko
Wed, Feb 1, 2023 - By Ian Harvey
Here are some general grip waxing principles and then some Toko specific tips. How you wax your skis has a lot to do with not only the conditions but also your skis and how they are related to you.
Camber
First, the main thing that I want to draw attention to is the idea of residual or resting camber which is different from camber. There are a few different ways to measure and define camber, but in general, camber is how much force needs to be applied to the ski to get it to compress until it gets really hard to compress. This is translated into a ski being appropriate for a skier of a particular weight range such as 150-165 pounds which you sometimes see marked on skis. Residual camber is how far apart the ski bases are under foot when the camber is compressed. There comes a point where the skis simply won't close anymore, what is left is residual camber. This is generally measured in millimeters.
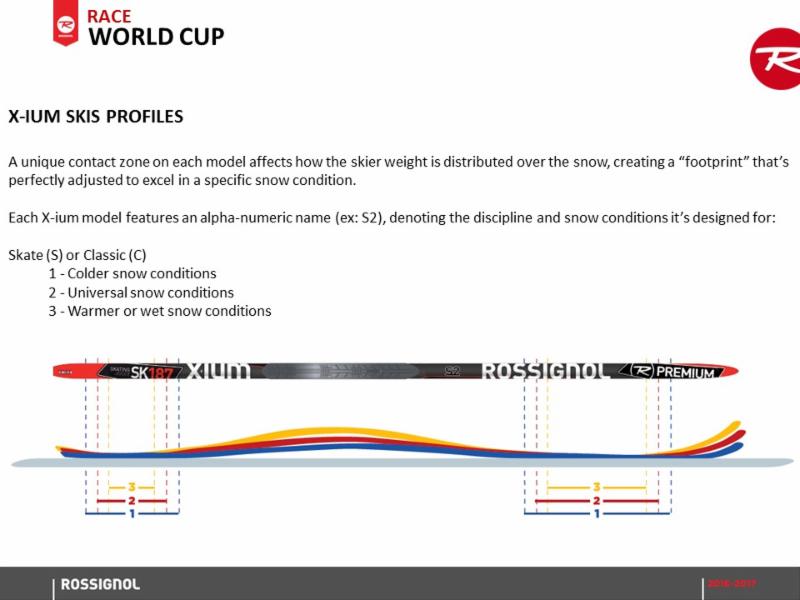
This resting camber is generally reflected in the model name such as with Rossignol C1 (Low resting camber), C2 (medium resting camber), or C3 (higher resting camber). A Classic ski should be fitted to your classic skiing needs. If you primarily are skiing in cold hard wax conditions a C1 ski would be right for you. If you want a more universal ski that can handle both hard wax and some klister covered conditions then C2 would be the appropriate choice. For klister only skiing a C3 with a higher resting camber will accommodate that thicker klister wax. The resting camber of the ski should be decided based on the conditions you plan to use the skis in and the stiffness of the ski relates to whether it will fit you or not.

I would suggest to most racers that they start their ski fleet with a C2 classic ski to be able to cover a broader range of conditions. From there I would add either a C1 or C3 depending on what part of the country you live in and what type of snow conditions you see more frequently.
If you were racing professionally you would specialize even further with your ski fleet by having C1, C2 and C3 skis for both soft or hard track conditions but for most skiers I would recommend sticking with these 3 ski models.
Kick wax pocket
You need to know your skis kick wax pocket. You not only need to know your kick zone obviously but you also need to know how high and long your residual camber is. This greatly affects how you need to wax your skis for best results. Sometimes a ski's grip zone is farther forward or back than another. This can be changed by moving the binding or accepted as is. Either way, the skier needs to be very aware of the grip zone and how it closes. A grip zone is not consistently flat despite what some ski manufacturers might tell you. It is thin in front and in back (on the ends) and thick in the middle. This needs to be reflected in how you wax of course.
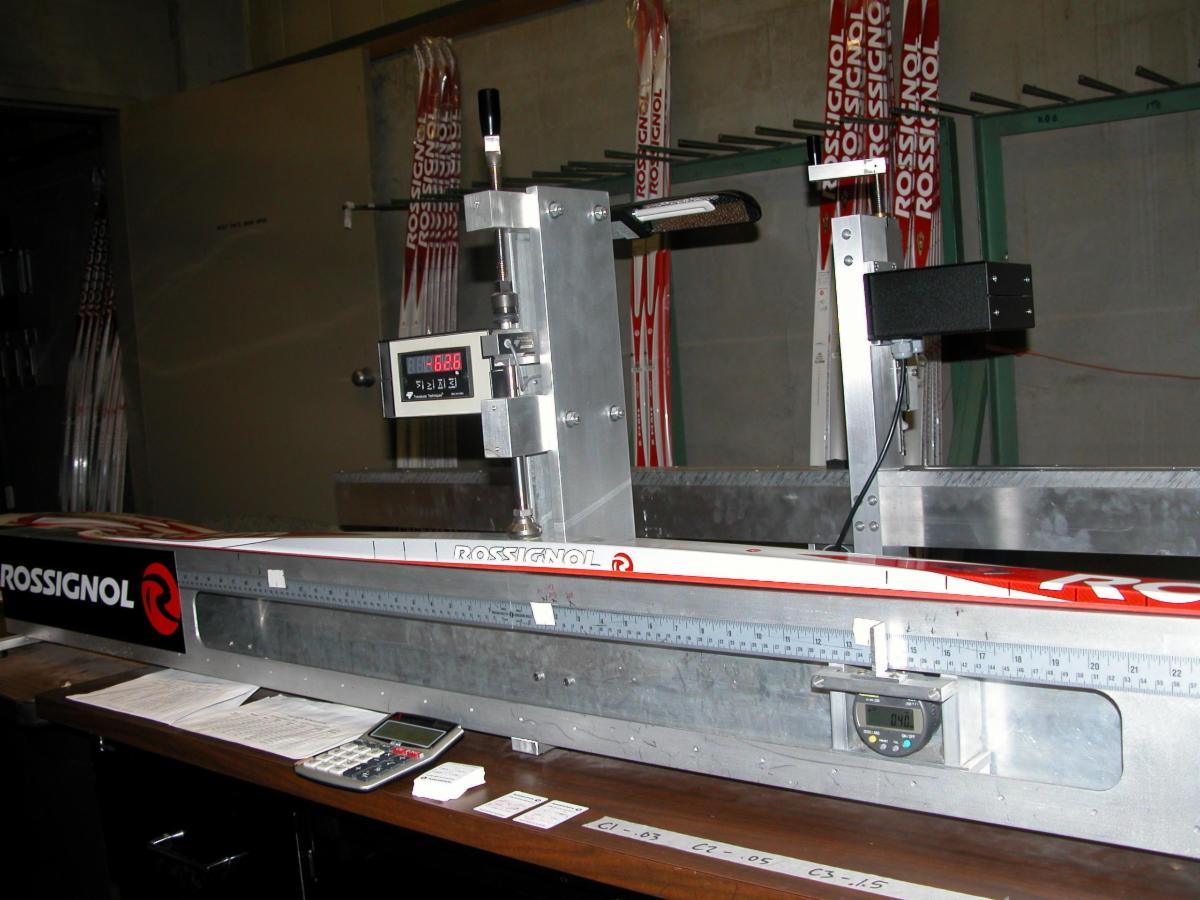
My recommendation would be to have your kick pocket measured on a flex bench. This is typically done by using pressure to measure the ski at half the skiers body weight at different balance points on the ski. From there a feeler gauge can be used to mark hard wax and klister pockets which is typically done with a .2 and .4 gauge. This needs to be reflected in how you wax of course.

In the past the C1 model had a very low resting camber but it also did not have much carrying capacity to keep a skier from collapsing the pocket too easily. Frankly it was difficult to find a fast C1 model ski. That has all changed in recent years where the C1 is now a go to ski on both the World Cup and domestically. The C1 we are making now still has that low resting camber that we want in a hard wax ski but the pocket, especially in the front of the ski, doesn't collapse with a slight shift in body weight. What you get is a very fast hard wax ski that hold the kick wax off the snow when you need it to but is still easy to kick.
Kick waxing
Generally speaking, when I kick wax my skis and I want to have good skis, I will start out by applying my glide wax. When that process is completely finished, I will sand my grip zone. I use 180 grit for grip wax (stick). Sand lengthwise along the grip zone making sure to stop within your grip zone. Just roughen the area up and you're done. Remove the ptex dust.
Then normally (unless it's a very short race in non abrasive conditions) I'd apply Base Green Nordic Grip Wax as a binder. This stuff is durable and whatever you put on top of it is going to stick to the base of the ski far better than if you didn't have the Green on as a base layer. To further improve durability, heat it in with an iron, heat gun, or torch. Run a cork through it lightly to smooth it out.
Most people apply too much Base Green when using it as a binder. Generally I'd say in not so abrasive conditions apply so little that you can clearly see the sandpaper striations. In more abrasive conditions you need more. Apply enough that the sandpaper striations are covered up completely. See the video below for a demonstration with explanation.
The next layer can be your wax of the day. Generally I would apply a light layer the full length of the grip zone and cork it smooth when finished. Then I'd apply another layer only in the middle 2/3rd of the grip zone and cork it smooth. Then full length and cork. Then middle 2/3rds again and cork. Usually this will be enough. If your skis have a higher residual camber you might need to do this step another time or two. If your skis have very little residual camber, adding more wax like this would simply make the wax drag creating friction that would slow your skis and wear your grip wax off. See the video below for a demonstration with explanation.
More considerations regarding skis
Compared to your weight, some skis have a longer camber and others can have a shorter camber. If you have a few pair of skis and understand them, this can be to your advantage. For example, sometimes the tracks have some snow in them that is sugary or not stable. Even if you have the right grip wax, the snow in the track breaks or shears. If, on a day like this, you use a pair of skis with a longer grip zone, there will be more contact with the wax on the snow for a longer area and the chances of the snow shearing under the skis will be diminished compared to a ski with a shorter contact zone under foot. Same wax, different skis yielding a longer or shorter contact area with the grip wax yielding drastically different experiences and kick wax jobs.
If you simply wax a pair of skis with a 18 inch kick zone 26 inches long, the wax will drag and wear where you waxed the skis longer than your grip zone yielding slow well kicking skis for a while until you lose your kick which won't take too long as waxing longer than your grip zone generates a lot of friction. So this isn't the solution.
Also, many people think that waxing with soft skis in soft snow is the way to go. That's not at all the case. Soft snow "fills up" the camber of the ski creating more contact on the grip zone than in hard snow conditions. This is the case when it snows a lot or when the snow gets skied in to the point that it becomes "mashed potatoes". If you go with very soft skis (soft track) in such conditions your skis can ice up very easily because of all of the extra and constant contact between the wax and the snow. Additionally, the additional camber can create a "cupping" effect in softer snow packing the snow against the camber creating more solid kick. Of course skis with a bit more residual camber will glide far better in these conditions (and in general) because of less grip wax contact with the snow which will have more contact with the base compared to in harder conditions.
In such soft conditions, the most important thing that you can do to have good kick, is have an appropriately delicate kick for the conditions. If you kick like a horse in soft snow, you will slip badly as you will punch through the snow creating slippage. If you kick sharply but with finesse and with a faster turnover, you will have better grip (or in some people's eyes, a better "wax job"). It is the same in tricky waxing conditions.
Have you noticed that in tricky waxing conditions some people always seem to have "bad wax" whereas others have "good wax"? More than likely if this is a trend the difference has nothing to do with their wax or ski selection but rather it's their technique that is the difference in their "wax jobs". Skiing upright (with your weight naturally over your wax pocket rather than leaning forward such that your weight is not pushing your wax pocket into the snow), kicking sharply but with finesse, and not trying to ski with power but rather maintaining a reasonable turnover (frequency) are keys to having "better wax" in tricky conditions. Trying to ski powerfully with long strides and a slower turnover while leaning forward excessively is a recipe for commonly having "poor wax" in tricky conditions. So, skiing well yields "good wax" commonly.
Waxing Techniques
Sometimes the snow is tricky or finicky and when you wax with the wax of the day according to the snow temperature you are not getting enough grip. This can be due to a myriad of factors. The more transformed the snow is in the tracks (compared to powder snow), the warmer you will need to go despite snow and air temperatures. When the tracks become very skied in, it can have the effect of transforming the snow too (creating a glaze for example) which can call for a warmer wax. Also sometimes the snow is loose and you get good kick where the track is hard and skied in but less kick where it is loose. In that case you can add layers creating a cushion so the looser snow sticks to your grip wax easier. This can cause icing though so often times you will want to cover this thicker application with a thin layer of a colder wax to prevent icing. This technique can be done with hard track skis, but isn't so effective with very soft skis because there isn't room in the residual camber for these additional cushioning layers and your wax could drag and ice up.
Base Green Trick
In certain types of snow you can do the "Base Green Trick". The condition most common for this is when the snow is between klister and hardwax conditions. It is semitransformed to the point where hardwax can yield dubious kick and also wear off quickly. Sugary snow also is a condition where the Base Green Trick works well. Another condition is where there are multiple conditions on the course due to shade/sun exposure (wet transformed snow but also non-transformed more arid snow). This Base Green Trick has a tremendous range in the conditions that it works in.
Choose a pair of skis with a decent residual camber - at least hard track skis and probably klister skis. Then apply a thick base green layer on a short klister length zone. You want to keep the Base Green off the snow because it is actually quite draggy so keep it short and on skis with a residual camber enough to prevent friction. Heat in this first thick layer and smooth it out. Let it cool and harden. Then apply subsequent layers of Base Green until you can see the green color on the black base. At this point the wax will have a very gummy consistency and will kick on basically anything. The key is to keep it off the snow by waxing stiff skis and for a short zone. See the video below for a demonstration with explanation.
Base Green Sandwich
In conditions that are between Base Green Trick conditions (somewhat transformed) and regular grip wax conditions (less transformed) you have semitransformed snow. These conditions can require a bit more cushion and also some durability as they are more abrasive than non transformed snow. Especially for longer races, what works really great here is the Base Green Sandwich Technique. Start out sanding the grip zone and then applying a normal application of Base Green binder. This technique is really only applicable in Blue or Red temperatures. Let's say it is Blue. Apply a layer of Blue along the whole grip zone and cork it smooth. Then apply a thin layer of Base Green on top of it and cork it. Then apply a thin layer of Blue on top of it and cork it. Do the same in the middle 2/3 of the ski (Green, cork, and then Blue and then cork).
You will see that having the Green sandwiched in the middle yields a very different kind of wax job. It's more elastic and cushioned. It's more durable and kicks better for longer. It's great in long semitransformed snow skis.
Hard over Soft
Earlier in this piece I mentioned that in some conditions such as loose snow you might want to cover a softer grip wax with a thin layer of a harder wax. This works great to provide a cushion for looser snow to stick to while preventing icing. This is also a great technique if you are starting your ski in cold conditions and expect things to warm. You can start for example with Base Green and then multiple layers (full length and middle 2/3) of Red corking between layers and then cover everything with a layer of Blue. As you ski and the Blue grip wax wears the Red will come through and work in the warmer snow. Again, it helps to have some skis with a bit of residual camber for this otherwise the softer Red wax can wear off despite the Blue cover if there is too much contact with the cold snow early in your ski.
Corking
Corking itself is an art. Each surface of the cork is useful to the experienced waxer. You can use the cork flat, on the end, or on a corner. You can use heavy pressure or light pressure. One thing that I want to point out in general is that you don't want to cork your grip wax into your glide zone. You can cork from the "outside in" to prevent this. You can also wax shorter than your kick zone and then cork the wax into the last inch or so creating a perfect transition from kick wax to glide wax. This is something that I do regularly. This video shows two basic corking techniques.
Sometimes they can yield exceptional kick to glide ratios and simply a great skiing sensation. Of course klister is generally applied in fully transformed snow or extremely wet snow. When using klister, generally speaking applying a thin layer of Base Green Klister as a binder layer is recommended followed by a layer of the wax of the day. Here is a quick video demonstrating how to apply
In some kinds of semitransformed snow or in transformed snow with a skiff of powder on top, the way to go is a layer of klister covered by the grip wax of the day. This is not difficult to do, but the mistake most people make is applying too thick a layer of klister which makes covering it with grip wax very difficult and it also makes for slow skis. Sometimes for a thin application the Spray Klisters are excellent as they go on very thin and easily. Toko Base Green Spray Klister is also an excellent klister binder that is quick and easy to apply. If you are waxing for a team or a family, this wax will be very appreciated.
Grip waxing is an art and the better you are at it the better the classic skiing experience will be especially in trickier conditions. However ski selection and knowing what skis to use when is also critical especially for racers. Lastly if you want to have good wax consistently especially in tricky waxing conditions, the best thing that you can do is develop excellent classic skiing technique including a light snappy kick with finesse, a proper body position, and turnover that matches the conditions.
