|
Equipment
The Ultimate Home Wax Bench
Part 4: Handling Multiple Pairs of Skis
Feb 16, 2002
If you're a racer, you probably have multiple pairs of skis -
at least one pair of classic and a pair of skaters. And you tend to wax all of them at the
same time: When preparing for a weekend of racing, I clean and prep wax all my skis with what
I guess to be the wax for the freestyle race on Saturday and the classic event on Sunday.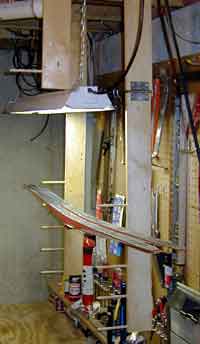
Managing those skis while waxing is typically problematic:
They're easily knocked over if you lean them against the wall and the wax can run, they get in
the way if you lay them on your workbench, and you trip over them if you lay them on the
floor.
The solution to the problem is a ski cooling rack. There are
many ways to build one (wall mounted, a stand for the top of your bench, floor mounted), but
I'll show you what I've done: a ceiling mounted rack (picture at right, and also picture in
Part 1: The Basic Wax Bench.)
Creating the Pegs
The basic construction is simple: Put dowels into the long edge of two 1x4's then attach
to 1x4's to the ceiling:
- Put a pair of 1x4's in a vise, long edge up. How long are the 1x4's? See the discussion
later... (Don't have a
vise? Screw them to the edge of you workbench).
- Take a pencil and make a mark holes for the dowels. Start
about an inch from the bottom and mark a drill point every 4 inches or so. If you have
older classic skis with a big curve for the tip, you may want to 5 inches between the
holes. (Having both 1x4's together simplifies the process of marking holes).
How many holes in each 1x4? The number of skis you want to wax PLUS one. You'll notice in
the picture that I have 5 sets of pegs - I tend to wax up to 4 pairs of skis. The extra
set of pegs is for putting the freshly waxed first ski of a pair, so the second ski isn't
blocked.
- Using a 5/16 drill bit, drill a 1 1/2
inch deep hole (more or less) at each marking.
- In the first hole, tap in a 5/16 wood dowel till it bottoms.
Measure 4 inches up the dowel and saw off. I used a
hacksaw. Don't get too aggressive or you'll break the dowel at the hole. (If that should
happen, simply use a smaller drill bit to drill into the center of the dowel, then pull
the bit - and dowel - out). Repeat for every hole.
 How
long are the 1x4's? How
long are the 1x4's?
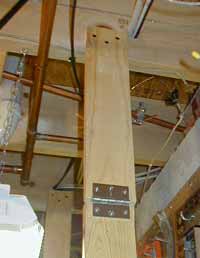
Every basement or work area is different, so you'll have to figure that out on your own. I
held up a 1x4, overlapping the exposed floor joists above and guestimated. I used drywall
screws to attach the 1x4's to those floor joists (picture at right). Your solution could
involve metal angles, screw eyes and hooks, or some extra wood.
Coming unhinged: A variation.
I tired of having to unscrew the rack from the ceiling at the end of ski season (so I wouldn't
have to reach past them to get to tools stored on the wall). I added cheap door hinges part
way down from the ceiling. The hinges serve a couple of functions:
- They will allow the peg supports to rotate up to the
ceiling (I'm going to add a screw eye to the bottom of each 1x4 and use a hook on the
ceiling to hold them to the ceiling) and
- You can temporarily push them out of the way to reach for
things on the wall.
- They allow the supports to absorb bumps.
Alternatives
to hinges? Maybe hooks on the ceiling joists and screw eyes in the ends of the 1x4's. I just
happened to have hinges...
 For me, the multi-ski cooling rack has made waxing skis that much
more efficient and stress-free. For me, the multi-ski cooling rack has made waxing skis that much
more efficient and stress-free.
The Ultimate Wax Bench
Series:
Part 1: The Basic Wax Bench
Part 2: Preventing a Mess
Part 3: Attaching a Swix Profile
Part 4: Handling Multiple Pairs of Skis
|