
| Home | Racing | Training | Rollerskiing | Trails | Weather | Equipment | Forums | Photos & Video |
|
|||||
|
|||||
|
Equipment So we have a working bench from Parts 1 and 2. Now we have a problem - how to attach a Swix Profile to the bench. There's no room for a vise, because the bench doesn't have a lip to which a vise can be attached.
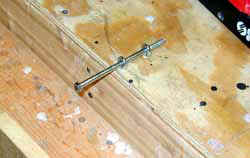
The Swix Profile has two sets of holes in the side of it's base that go all the way through. Place the bench on your wax table, toward the front. Find the holes and mark the table on either side of the bench. Pre-drill four holes - you'll then screw in four screw eyes. Make sure the screw eyes are close to the sides of the Profile. Place the profile between the sets of screw eyes, then push a 1/4" bolt through each front screw eye, through the Profile, and through the back screw eye. This method will securely hold the Profile to the bench, but allow you to quickly remove it for traveling by simply pulling the bolts out.
The Ultimate Wax Bench
Series: |
 No
problem. We can create a very easy and cheap Profile quick-connect / quick-release using four
screw eyes and a bolt.
No
problem. We can create a very easy and cheap Profile quick-connect / quick-release using four
screw eyes and a bolt.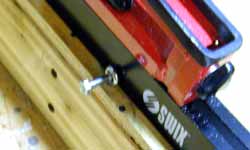 Finally,
we create a
rack to hold multiple pairs of skis while they cool...
Finally,
we create a
rack to hold multiple pairs of skis while they cool...